Showing posts with label Mod Podge Mama. Show all posts

Sunday, December 2, 2012

Pinterest Printables on Canvas for Christmas

I love all of the super cute printables you can find on Pinterest these days and while I normally frame a couple each season, I thought it would be fun to canvas a set of them this year.

I found these chalkboard canvases and decided they would be the ones! I downloaded them from Nest of Posies and then printed them on regular copy paper at Office Max as an 8x10. My other supplies included 4 8x10 canvases from Hobby Lobby, ribbon the width of the canvas trim, Mod Podge, and my glue gun.


I trimmed the pictures to size and then applied a light even coat of Mod Podge on the canvas before smoothing my picture onto the canvas. Don't worry if the edges lift a little.


Next I put another light coat on top of the pictures focusing on the edges. Don't worry if it looks blotchy, it will dry clear....


See! All better now that it is dry!


You could be done at this point, but I wanted to add some ribbon to disguise the canvas a little more. I bought red gingham from Hobby Lobby and just made sure it was the width of my canvas. 


Using hot glue, I ran a strip of glue along the edge of one side and applied my ribbon. I started and stopped on the top right corner with each one. I over lapped the ribbon just a little on each. I used the top as my break thinking everyone who sees these will be shorter than the top. :)


I placed these in my dining room in a spot where I normally have canvases of my daughter. I love the look they create for the holidays!


What do you think?


If you like a little more sparkle in your decor, I think these would be cute with a little silver or gold glitter in key places. I would use glue and highlight word JOY and then sprinkle glitter and dust off the excess. Decorating the curly Qs around tidings would also be fun!

So glad Nest of Posies played around with chalkboard effects and shared with us!

Thursday, December 8, 2011

Handmade Christmas: Mousepad

I never craft for boys- they are just harder and especially not for my husband who is the most difficult! But, this little handmade item is great for boys or men in your life. It works just fine for the girls, too!

You can buy 5 12x12 cork tiles at Hobby Lobby for under $10. I used my handy 40% off coupon and got them for under $5. I then trimmed the cork using regular scissors to the size of a mousepad.
Next, you mod podge onto the cork pad a printed paper or fabric. I used Superman wrapping paper I had on hand. Wrapping paper, scrapbook paper, fabric scraps, pictures printed on cardstock, be creative! Trim the paper/fabric to the size of your cork.
I then mod podged onto the wrapping paper a pictures of my husband and daughter dressed in their superhero t-shirts. If you are using wrapping paper, you are know all done! Because that paper is so thin, I would not recommend another wet layer of mod podge on top. However, a thicker paper or fabric, would need another layer on top. It will seal everything and create the slick glossy effect.
Thanks for joining in- one more day in the handmade Christmas series.

Monday, December 5, 2011

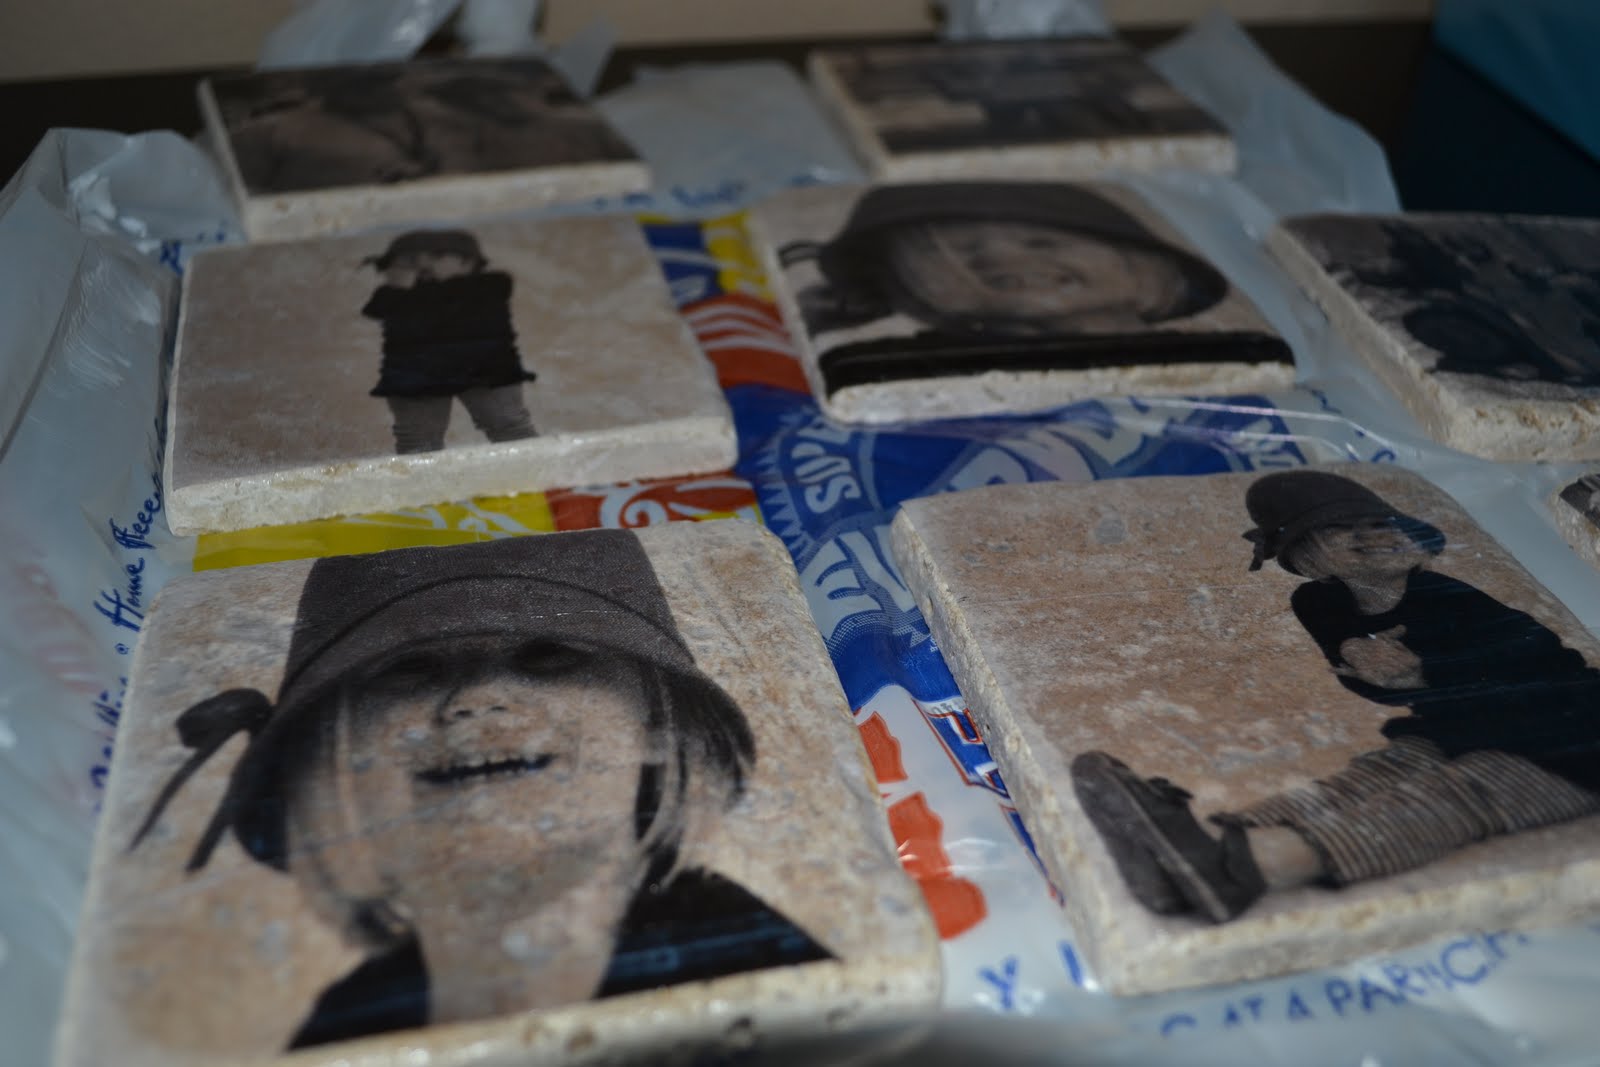
Handmade Christmas: Photo Coasters

This might be my favorite Christmas project. These look so professional- my husband was impressed. These are going to make one grandparent very happy and the other jealous!

Here is the supplies you'll need along with cardstock, tissue paper and Mod Podge. The tiles are at Lowe's or Home Depot and are in the flooring section, not kitchen backsplash tiles. I found the cork at Hobby Lobby. The tutorial I saw also used felt. The spray paint is clear finishing spray from Lowe's.

You'll want to cut white tissue paper just smaller than 8.5 x 11 and tape it to a piece of cardstock. I lined up two sides of tissue and taped them down and then cut the other two. It made it much easier.

Next, print your photos out onto the tissue/cardstock sheet you created. Cut out your 4x4 picture. It was much easier to cut both the paper and the tissue and then throw away the paper. A white photo background works best rather than a busy picture. I took mine at Picture People and just bought the CD of the photos to be able to edit them and reprint on tissue.

Using mod podge, place a thin layer across the top of your tile and then adhere your tissue paper printout. Carefully rub it flat pushing any bubbles out.

You will then do 3 separate layers of mod podge on top of the photo allowing it to dry in between. This serves as a glue and a coating so that the coaster can get wet.Next, spray a couple of coats of finishing spray over the coasters, again allowing it to dry.

Finally, add your cork or felt backing to each coaster.

I used hot glue to attach the cork. These pictures of my daughter had a white background and they allowed the detail and texture of the tile to come through. The second set I did had more detailed photos and the tile is more subdued.


These are easy to package with a wide ribbon and bow!

This project is more reasonable than you'd expect- the set of 9 tiles was $3.98 and the cork backs were $2.77 for 7. I had to buy acrylic for $4.50 and had the tissue, cardstock and mod podge on hand. So, they were around $7 per set of 4.

With social media, it is easy to lift candid pictures and you could surprise someone with pictures of them from their blog, Facebook, Flicker, etc. If you'd rather not do personal pictures, you could do celebrities, scripture, landscapes, favorite football team, quotes, landmarks from past vacations, etc. Lots of ideas!

Saturday, December 3, 2011

Handmade Christmas- Fabric Covered Tins

I am suddenly realizing a problem with my handmade Christmas series... there will be no surprises under the tree for my family! I guess the surprise will be what items are for whom!

My husband loves Altoids, so when I saw these fabric covered tins online, I knew I had the supplies on hand to make these.
Using scrap fabric, I cut two rectangles a little larger than my tins and covered the tin with modpodge and then adhered my fabric onto the tin.
Using my fabric scissors I trimmed the fabric around the edges of the tin. I was fearful it would be messy or I wouldn't get close enough, but it worked out just fine.
Then, cut a long thin strip and adhere it to the sides of the tin. You'll want to start and end on the back side so your seam isn't visible. I did it with the lid shut to make sure I didn't interfere with the lid closing by adding the bulk of the fabric. Just open it up when you are done and wipe off the extra glue with your finger. It would suck to glue it shut!
Mod podge felt onto the inside and have fun using pinking shears to cut it.
In all, I spent $1 on these tins- for the felt. They wouldn't cost much at all even if you had to buy Altoids and a small amount of fabric. If you don't have Altoid tins on hand or want to make a bunch of tins, you can buy them here. Now it is time to give your cute little tins!
I can think of lots of uses for these little tins:

To hold a gift card

For a gym friend to keep their iPod shuffle and headphones inside their gym bag

For a friend that sews to keep small scissors or scraps inside

A place for jewelry when you travel or jewelry as a gift

A tin for homemade fudge or another small snack food

A Kleenex holder

What other uses can you think of?

Tuesday, December 14, 2010

12 Days of Christmas Favorites- Favorite Easy Gift

This is Day 2 of the 12 Days of Christmas Favorites.... scroll down to see the schedule. It includes my first linky party tomorrow, hope you'll join me!
I try to buy my team a small gift each year and my thoughtful husband buys the 5 women in his office who support his accounts a gift each year. We combined forces and with the help of a few craft blogs out there and made our co-workers fun bubble magnets.

Here are my supplies- mod podge, the clear flat marbles in the floral section, a 3/4" circle punch, glue gun, 3/4" circle magents and scraps of scrapbook paper.
You simply modge podge the punched paper to the flat side of the marble and hot glue a magnet on the back! Super easy!

I dug around in my scraps and found coordinating sets of paper so that I could make a set of 6 matching magnets as the gift.

The blue set
The red set, my favorite!
The brown and cream set
And, the bright and colorful set.
Here is a completed brown set and here is my gift packaging problem. I didn't pay attention to which magnets would respond positively and negatively to each other. I can't fight gravitational forces, so some sets and are jumbled like this!
I would recommend lining up 6 magnets nicely and then gluing your paper marble on top. The site where I saw these gifted them in Altoid tins which is super clever! I should have been stocking up on Marcus' stash! ha!

Here are all my marble ready for magnets!
If you have the paper and punch already, this project costs about $10 for 50 magnets! Great for teacher, co-workers, housekeepers, and babysitters!

Enjoy!


Thursday, July 29, 2010

Do You See What I See?

I made another set of alphabet blocks for a baby boy's shower this month.

Can you see his name inside the alphabet?


It is Grayson! We look forward to meeting Grayson in September.
Here are the directions if you want to make a set!

Monday, June 28, 2010

cReaTe sign

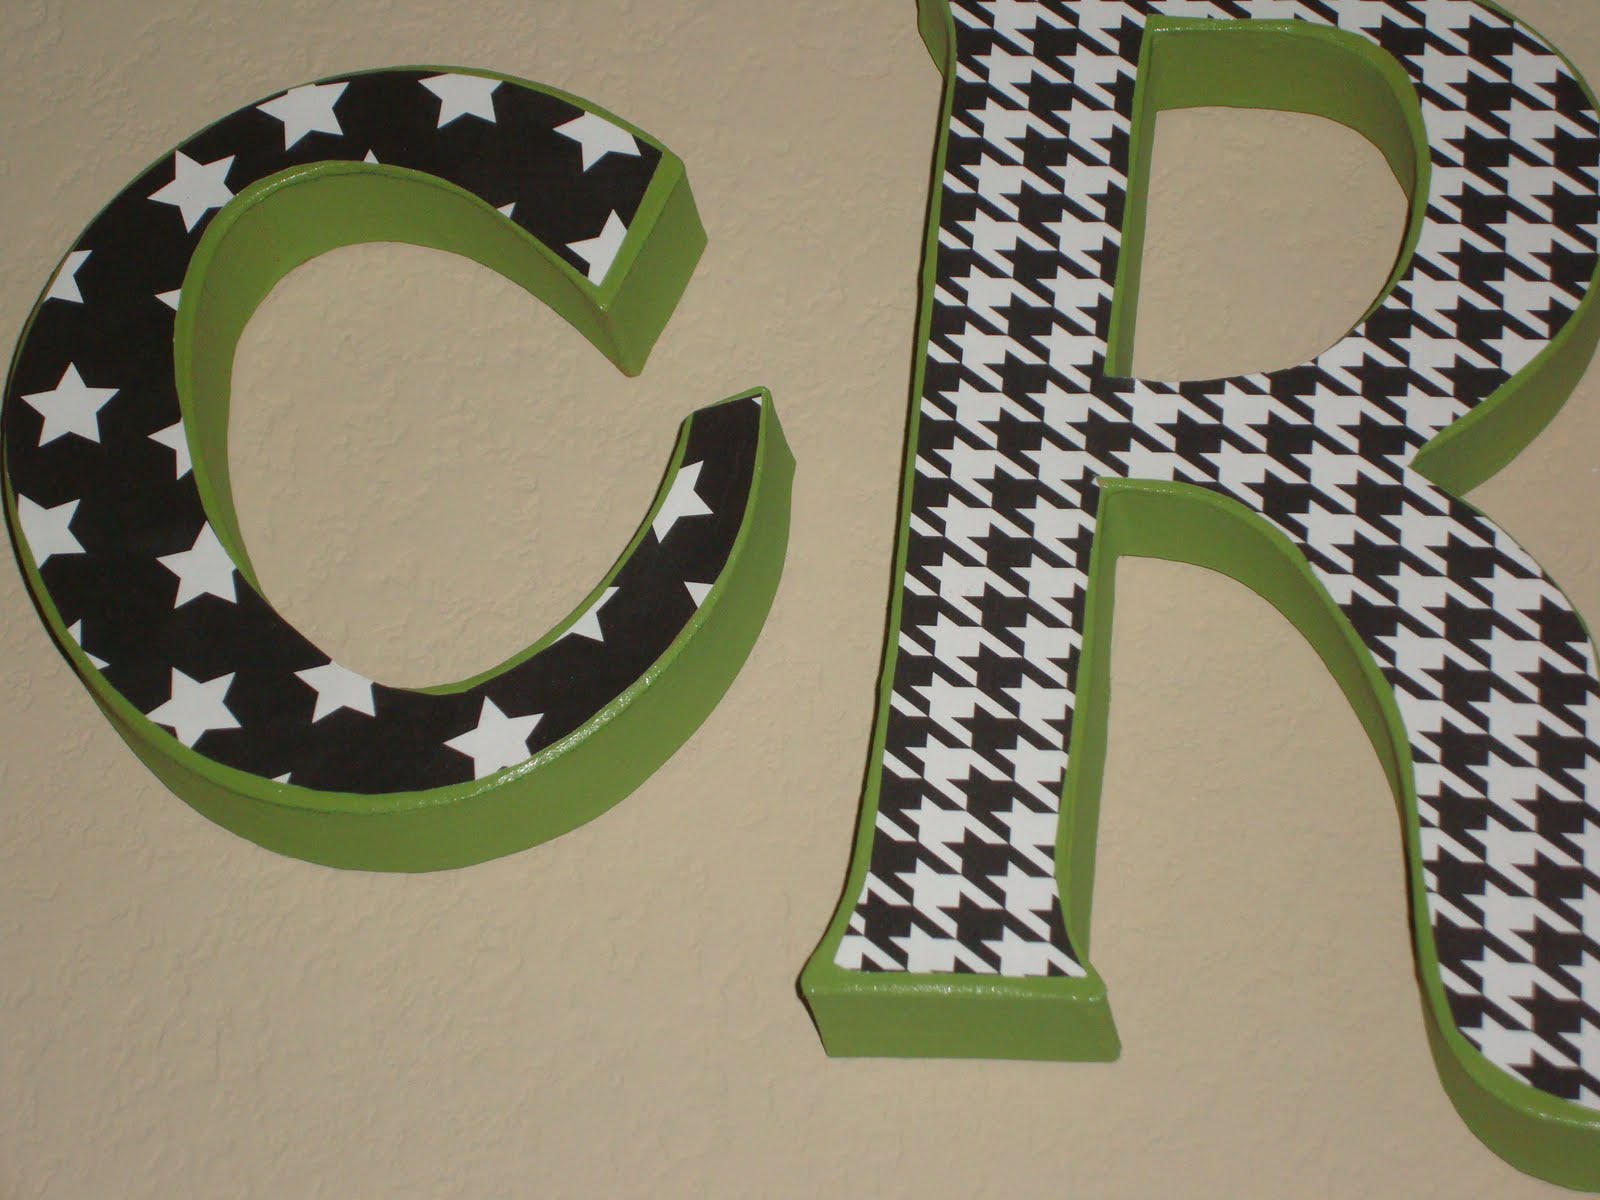
I took the same techniques used to create my favorite baby's blocks and made a fun new sign for my craft room. I swear I'll never be done with that room- please tell me your craft space is never done! It is a mess half the time! These are the simple inexpensive paper mache cardboard brown letters found at craft stores. I used Ceramcoat paint in a limey green and painted the outside and the top edges.
Then, I simply cut out scrapbook paper in the shape of my letters and paper mached it to the letters. These are easy to hang with 3M Double-sided foam mounting tape, also found at Hobby Lobby. For fun, I added a flower rosette leftover from a necklace I deconstructed.

These would be easy and cute in a child's room, teacher's room or above a doorway to say a pantry, laundry or powder room. They are easy to remove when your decor changes. I'm thinking a "Merry Christmas" set would be fun to mount during the holidays.


Thursday, April 22, 2010

Clothe Yourself With...

I saw this picture recently on etsy and decided I could make myself one! Here it is- perfect to hang in my closet above the hamper! What an awesome reminder of what God looks for in your appearance each day. I started by picking out 5 pieces of scrapbook paper from my stock.
I then painted a 8" x 14" canvas with a light yellow Ceramcoat paint. Three coats got it done!

Next I create my template. Using just an old scrap of purple paper, I made one big dress and then cut it into 5 layers. I scalloped the bottoms of each layer and numbered them 1-5. Just make your dress a little longer than you want so that when you cut layers and then overlay them you'll have the size you want.

I then laid my papers on the canvas made sure I liked them and started laying them down with modge podge. You can see where the "wet" parts are.I put a thin layer on the back and a thicker layer across the top and got my dress in place.

Next, I modge podged Colossians 3:12 in layers on my dress. Next up, I used my 1 3/8 inch circle punch and cut out a bunch of circle and then cut them in half.
Then modge podge the half circles around the edge. I recommend doing the top and bottom and then the sides. It will make sure that your corners match up.

To cover your straight or not so straight edges of the circles, line all 4 edges with ribbon. I put them down with modge podge and held the edges intact with Zots.

Finishing touches- Col 3:12 with marker, use Zots to add a bow, flower and button and spray everything with glitter spray paint!

Voila! The left one is mine and the right one is my friend Andrea's birthday present!
This was an easy and very rewarding project. Make yourself one!