Showing posts with label I Made This. Show all posts

Friday, December 6, 2013

Ruffle Bib Sweatshirts and Tutorial

I am now on Instagram! Feel free to follow me here and you'll get a sneak peek of projects like this one below. 

I pinned these cute ruffle bib tank tops earlier this summer and was so sad that I never got around to making this before the weather turned cooler. Fast forward to last month when I was complaining that Abby only owns long sleeve t-shirts and has nothing for colder weather... no sweaters, fleece, etc. I told my husband I was going to buy her some cheap sweatshirts and try to make them cute.

The ruffle bib came back into play and they work perfectly to spice up an inexpensive sweatshirt.


I bought two sweatshirts for under $10 each from Old Navy and then dug around in my fabric scrap bin and button bins to find some things that match. Abby will love wearing the pink one because the floral fabric was a scrap from her favorite baby blanket she still likes to snuggle with. Her name is Plexi. :)


The tutorial from Shannon can be found here. She has step by step directions and photos. I did the fabric picking and cutting and my Mom sewed them over the Thanksgiving holiday. She said they took no time at all. 


Monday, October 21, 2013

Scrapbook Paper Pumpkin

My MOPS group made these little scrapbook pumpkins last week. Super cute, huh? They were very easy and using my left over scrapbook paper, also really inexpensive. They would make great gifts during the Fall season or make a cute collage with a variety of scriptures.


Using online clip art, I made the template with a pumpkin outline and scripture of thanksgiving. The template is 7x7 inches and was framed on top of 8x8 scrapbook paper inside an inexpensive frame. I just removed the glass. If you'd like the template, I uploaded it here


Using a basic glue stick, glue the 1" scrapbook paper circles onto the pumpkin template, covering the black outline. Before you do the top row, add a stem and leaf. I used twine and ribbon.


You can use any scrapbook paper you like. I had a book of 12x12 sheets that all coordinated. I just used a variety of the orange papers.


 My cute little scrappy pumpkin perfect for the Fall.


Sunday, October 13, 2013

Fall Burlap Banner

I am involved in a MOPS (Mothers of Preschoolers) group at my church and volunteered to coordinate fall crafts day at our meeting on Monday. I needed to come up with cute and inexpensive crafts for about 60 women that could be completed in about 15 minutes. Pinterest to the rescue!

My favorite craft from the meeting was this super simple burlap banner.


At Hobby Lobby I found pennant already cut out and measured them at the fabric tables. They were 8" wide at the top and 10.5" long. They were just the size I needed, but not the price I needed. So, using my iPhone calculator, I found that I could get about 26 pennants for each yard of burlap sold on the bolt. I purchased 3 yards giving me 80 pennants for under $12. 


Using cardstock, I made the sample pennant and then traced it 80 times on the burlap. Then, I cut it out over a period of days. Cutting triangles with the point alternating up and down allowed the fabric to go a lot further.


Using stencils and a sharpie, I traced the letter F-A-L-L onto 4 pennants. Other girls did B-O-O or E-E-K for Halloween. If you have more burlap, I think HARVEST or THANKFUL would be cute.


After the letters were traced, I painted them with simple craft paint and a foam brush.


Next, the triangles were glued onto the ribbon with fabric glue. 


 Voila! An easy and inexpensive craft most anyone can do!


Tuesday, September 3, 2013

No Sew Burlap Football- Fall Front Door Decor

I struggle with what to hang on my front door in September. School has started, so summer is over and summer decor is all faded from the sun. It isn't really fall yet because it is still 100 degrees and pumpkins shouldn't be out in tank top weather. In Texas, September is football season! So, I decided to whip up a little something for my front door is honor of it.


I started with 1 yard of burlap (all of $3.99 at Hobby Lobby) and using a simple Sharpie made the shape of my football and cut it out. You will want to have the burlap foled in half to cut two footballs of the same size (a front and a back). Set aside one piece, it will be the back. Using one piece as the front, I then used my Sharpie to give me a place for the white "stripes" on each end and the cross lines on the top. I just eyeballed it and looked at Google images of footballs.


With my outline in Sharpie, I used white craft paint and filled in my football's details. I used a foam brush and small paintbrush until they were thick enough and had the detail I wanted.


I then went back over it and outlined the white paint with my black Sharpie. It added so much to the simple white paint. It looked much cleaner with the faded white edges outlined in crisp black lines.


Next, I stapled brown tulle to the plain piece of burlap that will serve as the back side. You can use tulle, ribbon, string, whatever you want. Homecoming ribbon usually in stores right now for your local school would be cute!


Next, line up your two piece of burlap with the detailed piece on top and the staples hiding your tulle for hanging on the inside. Using large pins, pin it all around the edge to line it up for stitching. You can trim any excess that doesn't look right at this point. 


Using just a needle and thread, close up your burlap football leaving a small opening for your stuffing. You can stuff this with anything you have- I used quilt batting this time. I have used tissue paper before. Newspaper, old t-shirts, shipping peanuts, it all should work fine. Once it is stuffed, finish "sewing" it shut and knot it up tight at the end.


This is what my hand stitching looked like. I used a large needle and thick brown thread and did a very large in and out of the burlap. Just put the thread through the needle and tie a couple of knots at the end and start at the back and work the needle to the front, back, front, etc. until you are almost done. If you run out of thread, don't worry, just knot up the end and repeat the initial step. If you want it more rustic and done quicker, a stapler will work just fine! Before loading the staples in, use a brown Sharpie to color them. Works perfectly!


 Look at this cute, big and fat football! I love it!


If you want to take it another step, you can add fun ribbons and a bow in your favorite school colors. Think NFL, college alumni, or even the local high school where your kids play! You can also paint on a school logo, name, or your son's football number in the middle.


There are lots of options! This simple method would work for other sports, too. A big orange basketball would look awesome in the winter! We made this one for some friends hosting our Fantasy Football draft party last weekend and added the colors of Purdue University, where he went to school.

It is honestly my favorite season of the year and I am happy my front door is joining in the celebration this year!

Saturday, August 10, 2013

Simple Washi Tape Bookmarks

 I ordered some washi tape off etsy and have found it to be so fun and easy! I will share a few more ideas for using it this month, but let's first start with using washi tape for bookmarks.

I am reading a one a day Bible this year and needed a bookmark to keep my place. With all of the e-readers out there, they don't exist much anymore. So, I crafted my own!


It is a folded piece of card stock, covered in cute washi tape and stays shut with two small magnets.


You can make one in just a few minutes and these are great for kids to make as back to school approaches!

I cut my piece of cardstock 3" long. I then added two pieces of washi tape and cut off the excess. If you know your washi tape is 1/2", then you can just cut your paper 1" wide. Essentially, you want it two pieces of washi tape wide and 3" long.


When you cover it in washi tape, just leave a little on the edges and fold it over and tape it down. This is what the inside looks like. I then covered the inside in 2 pieces of washi tape and cut the excess tape off at the end. It makes for a clean and fully covered piece of cardstock.


I then added a contrasting piece on the outside and centered it. It makes it more fun and covers the seam of the two pink pieces.


You will then want to add magnets to the inside. These are the ones I bought- they are the thinnest ones at Hobby Lobby.


Fold your bookmark in half (this is the inside you can see). Trim two magnets the same size. These magnets are sticky, so I removed the white sticker and attached the first magnet. Instead of trying to line up the top magnet just right, I removed the sticker on it, and connected the two magnets, then I shut the bookmark. 


When I opened it back up, I had two magnets stuck to the bookmark and perfectly aligned.


Here it is- my own cute little bookmark!


Happy Crafting and Happy Reading!


Saturday, July 6, 2013

VBS/Carnival Party Crafts

The last week of June I worked VBS at a local church and helped design crafts for school aged kids. The theme was Colossal Coaster World and was all things carnvial. There were lots of fun crafts for the kids to make and these two extras I found on Pinterest were among my favorites!

These bracelets were a big hit among the 4th - 6th grade kids. They are inexpensive and simple to make with long balloons cut into 2" strips and strung through elastic to make a bracelet. You can see detailed directions at Michelle Paige's blog. I would love to have them as a party favor when Abby is older!


The kids also made snow cones. I will not lie, these were my favorite and the worst craft of the week. I loved how they turned out and the kids wanted to make lots of them, but they were messy! I will totally make them again for a party- they wouldn't be messy if made by adults. Having 40 kids making them at once was a bit much! ;)


They are made by painting cheap craft paint onto small styrofoam balls with a foam brush. You add iridescent glitter while the paint is still wet and then glue the paper base onto them. We did it all while attached to a skewer to minimize the mess!


The template and detailed directions can be found at Creature Comforts blog. I simply added the VBS logo to the paper cone template before copying it for the kids.


If you are going to have kids do these, I would recommend they do the painting and then bring an adult the painted ball on a stick. The adult can then do the glitter (over a bowl) and glue the cone onto the ball. We premade the cones before VBS and had just stapled them shut. We made about 150 snow cones over 4 days! They take a few hours to dry, so be prepared for that. 

Monday, June 10, 2013

Summer Chevron Burlap Wreath

I made a new wreath for my front door today just in time for summer! It was quick and easy, so I wanted to share the simple steps with you.


Here are my supplies- burlap, chevron and denim ribbon, a flower, a cheap straw wreath and floral pins. Floral pins may be my new best friend!


I started by wrapping the entire wreath in burlap. I just pinned the back side, wrapped it tight and pinned the end. Afterward, I went back and added a few extra pins along the way to keep it extra secure. No need to even take the plastic off the straw wreath.


See much better already! At this point, you have a blank canvas to add whatever you want! Fabric or felt flowers would be cute.... your monogram or wooden letter of your last name.... a giant bow.... some festive seasonal flowers. There are so many options and you've spent less than $10!


I wanted a summery look that also worked for 4th of July. So, I decided to add in reds, denim and a good ol' country sunflower! I wrapped the wreath more sparingly in red and burlap chevron. It gave me the trendy chevron look I like and brought in some color. Just use the floral pins as you did on the basic burlap base.


I then made a big poofy bow from the denim looking ribbon. I learned how to make these multi loop bows back in college while working at a craft store. I am sure there are plenty of You Tube tutorials if you need help. You essentially make loops alternating between the left and right side of the middle loop and tighten it with a pipe cleaner. I secured the bow with floral pins.


At the base of the bow, I pinned in two green leaves and my big sunflower made from burlap. This flower was $3.50 at Hobby Lobby when flowers were on sale. They had roses and white burlap options, too.


My final touch was a denim ribbon loop to hang my wreath with. 


I love the colors mixed with the burlap on my new front door just in time for summer!

Thursday, May 16, 2013

From Glass to Mercury Glass in 5 Minutes

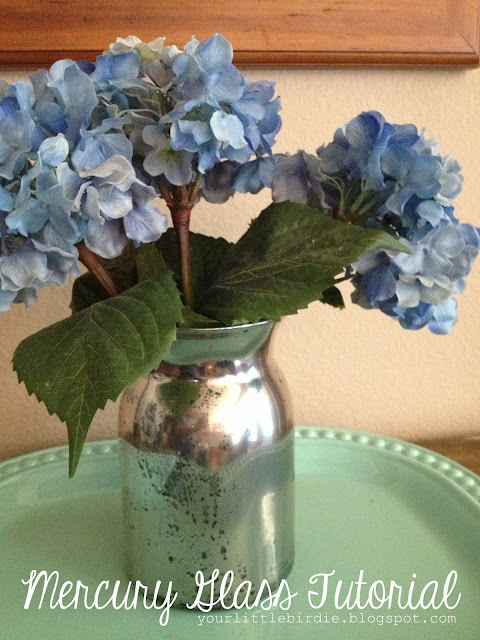
I pinned a mercury glass tutorial months ago and then went on a 2 month "I am spending too much time and money at Hobby Lobby" hiatus. Well today, I went in, bought what I needed and in less than 5 minutes I had this amazing vintage mercury glass vase. Let me show you how!


Here are your supplies- a spray bottled filled with equal parts water and white vinegar, looking glass spray paint and an object to paint. This vase was $4.50 half off. You could use the glass from a picture inside a frame, a mason jar, candlesticks, an old brass lamp, most anything!


Gather all your supplies and be ready- this goes quick. First put a couple of light coats of looking glass spray on the glass object. Don't worry about the inside or super even coverage. I have had some drip marks and they worked out just fine! I did spray the upper inside since it turns outward and would show.


Then you spray the container with your vinegar and water mixture and wait one minute.


Finally, using a paper towel (dry) just start dabbing the vinegar mixture off the vase. It will dull the shiny in places and literally pull the shiny off in others.


My insides were all kinds of a mess from spraying the upper inside portion, but this project is so forgiving that it didn't affect the final project at all.


Here is my finished vase, from glass to mercury glass in under five minutes!


I love the vintage feel it has and no one would ever guess it is a spray paint trick. I can think of so many things I want to paint just looking around my house. This would be beautiful to give as a gift with fresh flowers.


What a wonderful pin to have stumbled across!