Showing posts with label 12 Days of Handmade Christmas. Show all posts

Friday, December 9, 2011

Handmade Christmas: Beaded Serving Spoons

I love making beaded baby spoons for baby showers and decided to take that same "pattern" and try to make fancy serving utensils. These turned out beautifully and I may just have to keep them for myself!
The process is so simple that I didn't get many pictures, but I think you can do it without a photo tutorial! If you are a jewelry maker like I am, you'll have the main supplies you need on hand. You will want jewelry wire- this should be thick enough to be sturdy, but small enough to string through your beads. You also need wire cutters (the other tools pictures below were not used). The fun part is picking out your beads. You'll want some larger impact beads and smaller fillers. Think about the recipient- entertain during Christmas, go with a favorite football team for tailgating, you get the idea!
Cut a long piece of wire, maybe 1.5 yards. Begin by wrapping the wire at the non-serving end of your fork. Wrap it around 5 or 6 times making sure to cover up the end piece of wire. Then, string a couple of beads and wrap around 2 times, repeat over and over. If you find your beads are not staying close to each other and sliding down the spoon, I would wrap the wire between beads to give a little reinforcement. When you get to the end, wrap your wire 5 or 6 times and trim. The exposed end should be on the back side and if you can, tuck it into the wrapped wire.
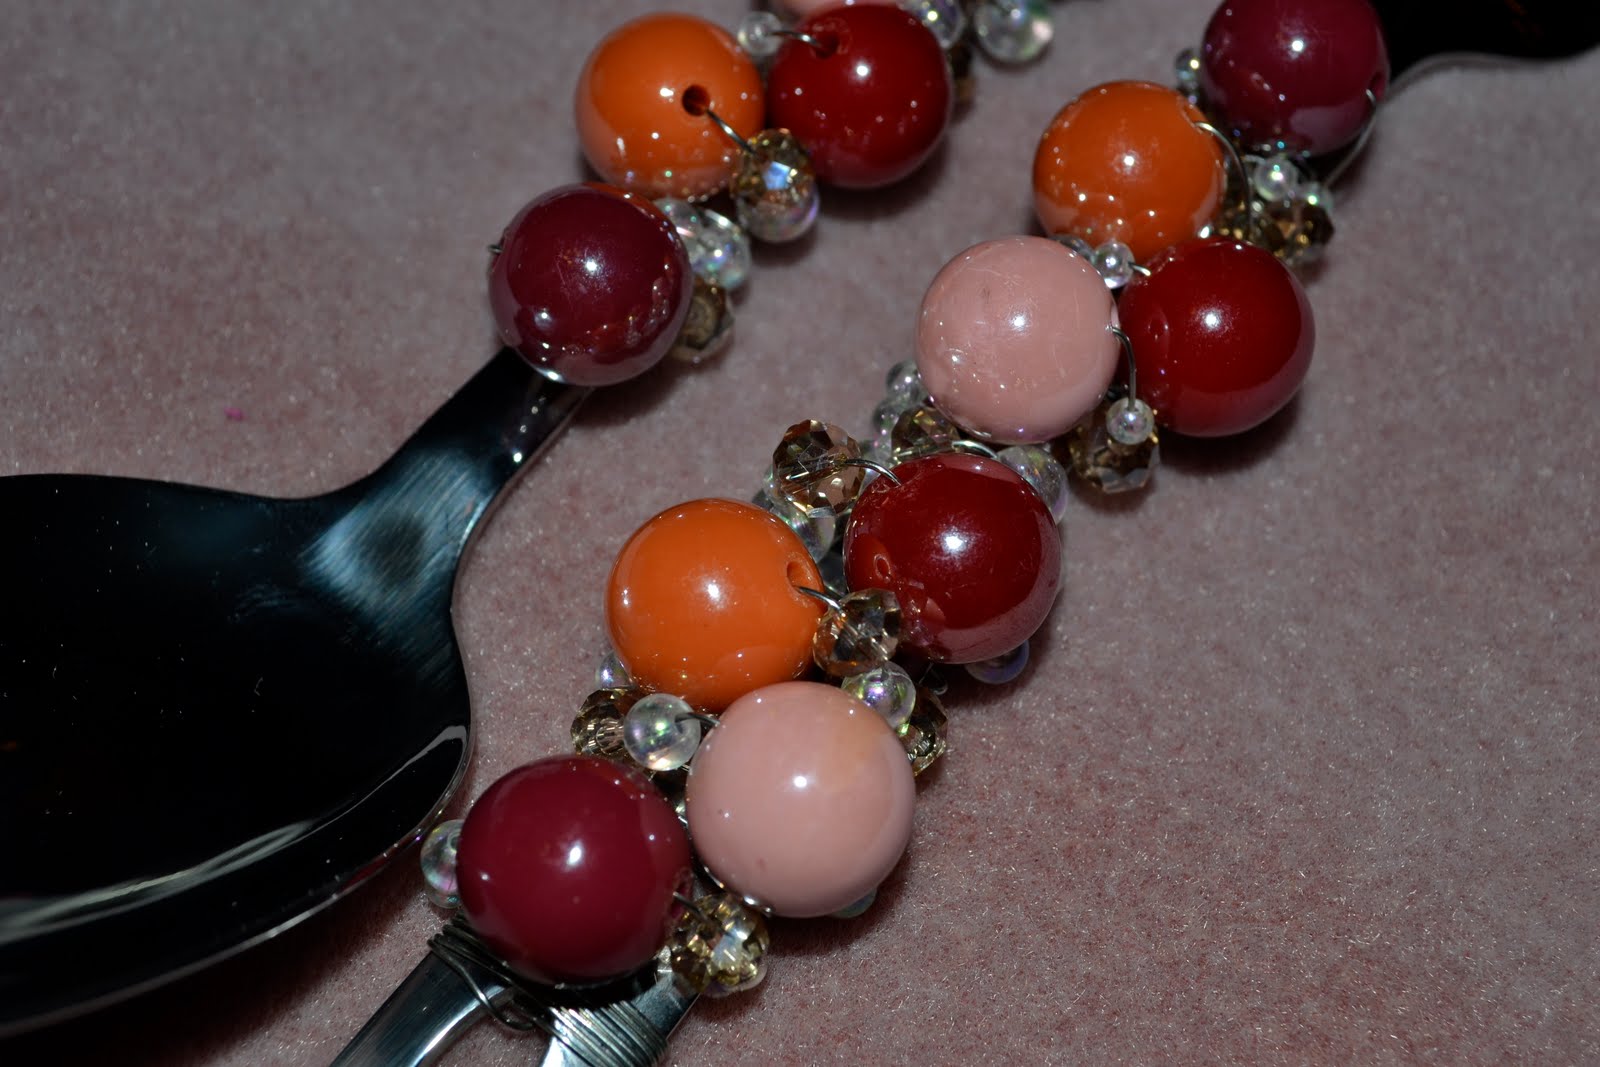
Ta Da! A pretty fork and spoon set that works great as a hostess gift! I had to buy a fork and spoon and the large statement beads. My grand total- $11!

Thanks for joining me for the 12 Days of Handmade Christmas. I hope you have found something new to make, love, and share! Come back soon for more crafts, recipes, and party planning tips. If you are new to the blog, leave me a comment. I'd love to get to know you.

Thursday, December 8, 2011

Handmade Christmas: Mousepad

I never craft for boys- they are just harder and especially not for my husband who is the most difficult! But, this little handmade item is great for boys or men in your life. It works just fine for the girls, too!

You can buy 5 12x12 cork tiles at Hobby Lobby for under $10. I used my handy 40% off coupon and got them for under $5. I then trimmed the cork using regular scissors to the size of a mousepad.
Next, you mod podge onto the cork pad a printed paper or fabric. I used Superman wrapping paper I had on hand. Wrapping paper, scrapbook paper, fabric scraps, pictures printed on cardstock, be creative! Trim the paper/fabric to the size of your cork.
I then mod podged onto the wrapping paper a pictures of my husband and daughter dressed in their superhero t-shirts. If you are using wrapping paper, you are know all done! Because that paper is so thin, I would not recommend another wet layer of mod podge on top. However, a thicker paper or fabric, would need another layer on top. It will seal everything and create the slick glossy effect.
Thanks for joining in- one more day in the handmade Christmas series.

Wednesday, December 7, 2011

Handmade Christmas:We Whisk You A Merry Christmas

Abby and I made these kisses filled whisks for our neighbors. They are super simple and inexpensive, not to mention fun for the kids to stuff!
Simple supplies- whisk was 97 cents at grocery store along with a bag of candies that could easily make 5 whisks and the labels are completely optional.
I printed out cute little Christmas images with my digital scrapbooking kit and made them 3/4 inch circles so that I could punch them out and attach them to the bottom. The hardest part of this craft was getting the sticky back off the kisses! If you'd like to use my images- here they are with a dark skinned Santa and a light one.
Finally, you stuff the kisses into the whisk! Easy!
I then put ours into the small cellophane bags they sell in the baking aisle and added a tag and a bow. A perfect little love gift for under $3!

Tuesday, December 6, 2011

Handmade Christmas: Gift Card Snow Globe

I hate to give gift cards. It is silly really because I never mind receiving them, but they just feel so impersonal when I gift them. When I saw this idea online, I knew it would help me get over my gift card concerns. Isn't this a cute idea!?!
You need a few basic supplies- mason jars, glitter, gift cards, and a few items to place inside your jar. I bought gold angels and balls at Hobby Lobby. They are with the mini tree ornaments. Snowflakes would be beautiful, too!
Hot glue the gift card onto the lid. I did a long fat strip and then pressed the card into it. I then added a little hot glue on the front and back to support the card. Hot glue pops off plastic easy enough that they can use the gift card and still have a globe afterward!
Next you want to glue on your goodies. When purchasing, make sure you buy items small enough, without too much detail and with a base that can be glued down securely.
Now, fill your jar with a few floating goodies and glitter. I added three more balls and both silver and white iridescent glitter. Fill the jar with water- I used filtered refrigerator water. Nothing fancy.
Turn your lid upside down and screw on tightly. No need to glue it shut - the recipient will have to open it to get the gift card! I used a very subdued gift card from Starbucks, but you could get a bright colored one and use those colors in your globe decor.
The balls float to the top and glitter settles on the bottom until you shake it all up!
I added a small gift tag and matching ribbon to my jars. A tip, write the gift message on both sides when hanging a tag. That will make sure when it is tied up all tight that it isn't blank :)
These globes are for Abby's two Mother's Day Out teachers. Not counting the gift cards, they cost my about $4 each. I had the mason jars and only purchased the ribbon, tags, and the floaties and glitter. I also have lots of ribbon, tags, and glitter left over for future projects!

Monday, December 5, 2011

Handmade Christmas: Photo Coasters

This might be my favorite Christmas project. These look so professional- my husband was impressed. These are going to make one grandparent very happy and the other jealous!

Here is the supplies you'll need along with cardstock, tissue paper and Mod Podge. The tiles are at Lowe's or Home Depot and are in the flooring section, not kitchen backsplash tiles. I found the cork at Hobby Lobby. The tutorial I saw also used felt. The spray paint is clear finishing spray from Lowe's.

You'll want to cut white tissue paper just smaller than 8.5 x 11 and tape it to a piece of cardstock. I lined up two sides of tissue and taped them down and then cut the other two. It made it much easier.

Next, print your photos out onto the tissue/cardstock sheet you created. Cut out your 4x4 picture. It was much easier to cut both the paper and the tissue and then throw away the paper. A white photo background works best rather than a busy picture. I took mine at Picture People and just bought the CD of the photos to be able to edit them and reprint on tissue.

Using mod podge, place a thin layer across the top of your tile and then adhere your tissue paper printout. Carefully rub it flat pushing any bubbles out.

You will then do 3 separate layers of mod podge on top of the photo allowing it to dry in between. This serves as a glue and a coating so that the coaster can get wet.Next, spray a couple of coats of finishing spray over the coasters, again allowing it to dry.

Finally, add your cork or felt backing to each coaster.

I used hot glue to attach the cork. These pictures of my daughter had a white background and they allowed the detail and texture of the tile to come through. The second set I did had more detailed photos and the tile is more subdued.


These are easy to package with a wide ribbon and bow!

This project is more reasonable than you'd expect- the set of 9 tiles was $3.98 and the cork backs were $2.77 for 7. I had to buy acrylic for $4.50 and had the tissue, cardstock and mod podge on hand. So, they were around $7 per set of 4.

With social media, it is easy to lift candid pictures and you could surprise someone with pictures of them from their blog, Facebook, Flicker, etc. If you'd rather not do personal pictures, you could do celebrities, scripture, landscapes, favorite football team, quotes, landmarks from past vacations, etc. Lots of ideas!

Sunday, December 4, 2011

Handmade Christmas: Cherry Lip Gloss

When I saw homemade lip gloss on another blog via Pinterest, I knew it had to be like making homemade marshmallows- more work than necessary for a reasonably priced item you can buy at Wal-Mart! I was certain it would take crazy ingredients that you had to order online. I was wrong!
To make your own flavored and slightly colored lip gloss, melt a tub of Vaseline in your microwave. I ran it for a minute at a time and stirred in between. It took about 5 minutes to full melt.
After it is melted, pour in one small packet of unsweetened Kool-Aid and stir. I used cherry expecting it to be pink and when it dumped in purple I freaked out! As it stirred up, the color lightened a lot!
I then spooned the mixture into my little containers ordered here. They are just 35 cents each and shipping was fast and cheap!

As it cools, it becomes solid again and you can see mine has very little color. Unfortunately, it also had very little cherry scent! I would recommend another Kool-Aid flavor!

You can make a variety of flavors and even add in cake glitter to give your kisser some sparkle.

I then used my Stampin Up scallop edge circle punch to cut out my printed labels on sticker paper. If using a plain circle punch, I think a 1 1/2 inch circle would be best. If you'd like to use the labels I created, they can be downloaded free here.
These little lip glosses are great for young girls- perfect for sharing with lots of friends! The cost to make 10 containers of lip gloss, only $11. Perfect for little friends!

Saturday, December 3, 2011

Handmade Christmas- Fabric Covered Tins

I am suddenly realizing a problem with my handmade Christmas series... there will be no surprises under the tree for my family! I guess the surprise will be what items are for whom!

My husband loves Altoids, so when I saw these fabric covered tins online, I knew I had the supplies on hand to make these.
Using scrap fabric, I cut two rectangles a little larger than my tins and covered the tin with modpodge and then adhered my fabric onto the tin.
Using my fabric scissors I trimmed the fabric around the edges of the tin. I was fearful it would be messy or I wouldn't get close enough, but it worked out just fine.
Then, cut a long thin strip and adhere it to the sides of the tin. You'll want to start and end on the back side so your seam isn't visible. I did it with the lid shut to make sure I didn't interfere with the lid closing by adding the bulk of the fabric. Just open it up when you are done and wipe off the extra glue with your finger. It would suck to glue it shut!
Mod podge felt onto the inside and have fun using pinking shears to cut it.
In all, I spent $1 on these tins- for the felt. They wouldn't cost much at all even if you had to buy Altoids and a small amount of fabric. If you don't have Altoid tins on hand or want to make a bunch of tins, you can buy them here. Now it is time to give your cute little tins!
I can think of lots of uses for these little tins:

To hold a gift card

For a gym friend to keep their iPod shuffle and headphones inside their gym bag

For a friend that sews to keep small scissors or scraps inside

A place for jewelry when you travel or jewelry as a gift

A tin for homemade fudge or another small snack food

A Kleenex holder

What other uses can you think of?

Friday, December 2, 2011

Handmade Christmas: Sugar Scrub

Have you ever wondered how they make scrubs? You'll never believe how simple it is! What a great gift idea for teachers, friends, Moms in a MOPS group, hostess gifts, and more!
The moment I used this on my hands, I proudly proclaimed, "I'll never waste money on scrubs again." It is inexpensive, easy and really does work!

These are your ingredients- regular table sugar, olive oil (cheap is great!), and essential oil of whatever scent you would like. It is Christmas, so I selected peppermint. You could mix and match and make your own scents.

I found this at Whole Foods, an organic grocery store in the area. It was in the homeopathic/bath section and is different from peppermint extract in the spice aisle.
Pour 1/2 cup plus 1 T of olive oil into 1 1/2 cup of sugar. Mix well.
It will be yellow from the oil and smell like olives. ha! Add in your peppermint (or other) essential oil until it smells as strong as you'd like. I used about 15 drops.
I then added food coloring to make the scrub match the scent.
My mixture, minus 3 hand scrubs for the family, almost filled a pint jar, like those used in canning.
I'll be gifting these to girlfriends and added a fun Christmas fabric and ribbon on the lid. Just cut your fabric a little bigger than the lid in a square and use your pinking shears. I created labels for my jars and printed them on full sheet label paper I found at Office Max. If you like my labels and would like to use them, click here.
In total, I spent $20 on the supplies since I had mason jars on hand and can make about 10 jars. A very inexpensive gift for friends and family. If you need to buy the jars, it still should cost you well under $5 each.

I originally found the sugar scrub here via Pinterest. Her "recipe" is double mine which would be great when making large batches for gifts. She also did a great job decorating the cute bottles with scrapbook paper. Here is another blogger with 24 different recipes and printables- you have lots of fun options!

Enjoy!

Thursday, December 1, 2011

Handmade Christmas: Applesauce Ornaments

Have you ever made cinnamon ornaments?
It only takes a couple of items at the grocery store and a few supplies you likely already have to make 10-15 cute ornaments perfect for a child to share with friends.
The ornament "dough" is made from a large bottle of cinnamon and a little bit of applesauce to serve as the glue. You mix and mix and mix!
Once it is mixed and taken on a dough form, you roll it out between 2 sheets of saran wrap and use cookie cutters to make your shapes.
It amazingly doesn't stick to the saran wrap at all!
We bought a dancer to use and share these with Abby Lu's dance classmates, but she was too detailed and her arms were too skinny! I found that hearts, stars, and crosses worked much better!
I found the edges were cleaner when I pulled the excess dough off while the cookie cutter was still in place. Once it is cut out, just use a straw or chopstick to poke a hole in the top to help with hanging the ornament later.
After they are all cut out, the directions say you can bake them or just leave them out to dry over the course of a few days. We did that and it worked just fine.
As they dry, they'll lighten in color.
In total, I made 12 ornaments (throwing out the dancers with broken arms!) and only spent $8. If you have to buy a cookie cutter, your cost will go up slightly. These would be fun accessories on the outside of a wrapped gift and make the room smell great.
Happy Gifting!