Thursday, June 28, 2012

VBS Amazing Wonders of Aviation Crafts

I am all crafted out.... I have spent the last two months cutting up crepe paper, fishing line, pipe cleaners and poking holes in paper plates, bowls, and coloring sheets. I have dyed rice and have been colored in glue. And, I have loved it all!

Our church's VBS was last week and my craft room is getting back to normal. I hope to have fun new stuff to show you soon. In the meantime, if you are looking for some inexpensive craft ideas for your own VBS, Sunday school or even home school, here are some of our favorites.


Whole World in His Hands... you singing along :)

Jellyfish with ribbon tentacles

In all there were 12 crafts, many of them came from the VBS model we purchased, but those that we found online were just as cool. I think the jellyfish was everyone's favorite! 

And, if you are looking for an inexpensive and time saving way to keep your kid's art supplies together, check out my inexpensive centerpieces! I made 14 of these with cups, plates and hot glue for about $11.


I am looking forward to next year!


Monday, June 25, 2012

Pony Bead Windchime

When my 10 year old niece spent a week with us, we made a pretty cool wind chime for her to take home- all with simple inexpensive pony beads!


Kyleigh filled my muffin pan, round cake pan and loaf pan with a single layer of pony beads.

Then, we baked them at 400 degrees for 20 minutes. They smelled awful, like burn your eyes awful.


When done baking, we let them cool and when you turn the pan over, they fall out. Or, with a little bang on the back from a wooden spoon they fall out.  


The little "muffins" range in terms of prettiness- I would recommend non-iridescent or glitter beads. The simple beads, especially clear, seem to do the best!


My husband drilled holes for us and with a little fishing line, Kyleigh had a wind chime to take home with her.


Oh the fun of summer crafts as a kid!

Thursday, June 21, 2012

Rice Art for Kids

I am at my church's VBS this week. I was asked to come up with crafts for 1st - 6th grade and am so grateful for sites like Pinterest that helped me out! One of the crafts kids will be doing involves colored rice and it turned out so cute, I had to share.

You will need vinegar, rice, and food dye.

Using 1 part vinegar to 2 parts rice (i.e. 1/2 c. vinegar and 1 c. rice) mix your vinegar and dye until you get the color you want. I found neon dye at Wal-mart and loved it! Add your rice and let it soak in the color for 5 minutes. 


Drain the rice and lay it out onto a cookie sheet (on your back porch in the Texas sun) until it dries. I was planning this craft for hundreds of kids, so I have been drying rice for weeks :) 


The kids can use the rice in anyway you'd like. For our craft, I looked for ocean coloring pages online, saved the jpeg images, added a scripture and then printed the sheets. This gives the kids a great shape to mimic in their rice.


My daughter did the star above, so this craft is great for toddlers! We applied our glue with a q-tip to minimize the "wet" feel too much glue gives and it worked great!


Monday, June 18, 2012

White Cheddar Bacon Wraps

So I am lucky enough to have a couple of girlfriends that are amazing cooks! One of them made these white cheddar bacons wraps at a girls night recently and we all devoured them!

You need- white cheddar (the secret ingredient), cream cheese, jalapenos, and bacon.


Simple prep- just half and de-seed your jalapenos and slice your cheese and bacon in half.


Fill each jalapeno with cream cheese, place a slice of white cheddar on top, wrap in bacon and poke with a toothpick.


Bake them on your broiling pan to capture the grease at 375 for about 20 minutes and enjoy hot!


These are a great party appetizer, perfect for guys night, and a wonderful side to Mexican food. Just have plenty of beverages on hand- these suckers can be hot!

Wednesday, June 13, 2012

New Gallery Wall... in process

I fell in love with this little girls room and this idea and decided Abby Lu needed a gallery wall!

I bought the new funky shaped frames at Hobby Lobby when wall frames went on sale and dug around in my spray paint bins for colors that matched her room.


Once they were all painted I played around with patterns and found what I think works best. I like have vertical and horizontal hangings. Once I got them on the wall, I liked them empty. So, they are currently empty while I look for inspiration.


These frames were originally navy, baby blue, and red. They are the same frames in my new master bathroom. I am hoping to fill them with cork boards, chalkboard, artwork of hers, and some fun pictures with her friends. 


Stay tuned for my progress!


Monday, June 11, 2012

4th of July Mantle and Cake Stands

I never know what to do with my mantle over the summer and decided to make it happen this year! We normally have a couple of friends over on the 4th and I hated not being decorated on that day. They likely don't even notice, but I do :)

Here is my new 4th of July mantle. It is simple and was inexpensive to complete!


I found this pennant on Etsy, but you could easily make your own. I didn't own enough fabric scraps or have the jute, so it was cheaper to just buy it. It is 9 feet long and works perfectly. I paid $12 for it, but if you have the fabric, very easy to make and would cost you nothing! The only sewing is at the top of each scrap to keep it tightly secured on the jute.


I bought 6 3-packs of flags at the Dollar Spot at Target and placed 3 flags in each mason jar with a little jute on tied around the jars. The jute wasn't necessary in the end because you can't even see it!


I wanted the words PEACE in the middle, but I couldn't find that; however, I do feel very blessed that we live in a country where we are free to worship our God, speak out for and against one another, and that we have so many cultures to learn from every day. Blessed fits us just perfectly! It was 50% off at Hobby Lobby and I spray painted it navy since it came in black only.


A view of the mantle from a distance... love it!

I visited a friend of mine's home on Wednesday afternoon. She lives 2 hours away or I would sneak over for inspiration weekly. I promise to give her more warning next time and bring my camera- she is my design goddess. I love her style. It is kitschy, country, comfortable, everything has a story and I just love it. She has piles of quilts, bookcases of luggage, and her liquor is in an old Coca Cola crate. Genius! I picked up on a few things she did and made some changes at my house.

My Dr. Pepper crate was lost on top my cabinets, so I brought it down and loaded it with fun stuff in my living room. I really want a yellow Coca Cola one now :)


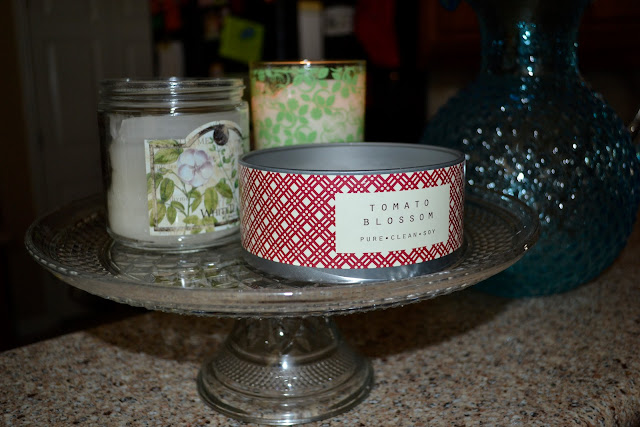
Alison had 2 cake stands holding items in her kitchen and now I do, too :) This one holds a mix of candles on the bar. I can light whichever send I am feeling that day.


Next to my sink, I used another pedestal for the soap, sweet & low, toothpicks and my vintage salt and pepper shakers. It is a fun touch to the kitchen.


Thanks Alison for letting me visit and take home a few fun new tips for my home!

Friday, June 8, 2012

Friday's Foot Fetish- LOVE LOVE LOVE!

These are my new favorite shoes- Jellie by Callisto. I wear them with jeans, dresses, capris. They are casual and dressy. The colors are bright and match most everything! 

LOVE LOVE LOVE!

Wednesday, June 6, 2012

My Favorites for Summer

Yea for summer! Here are a few of my favorite things right now that are perfect for the summer season!

This new Dole watermelon juice is sweet and refreshing! I love it after being at the pool or just outdoors. I am thinking I need to make it into popsicles!

Have you seen "The Shops" promotion at Target? They have products from boutiques around the country featured in the store. I ran into Target while at Sea World a few weeks ago and grabbed some lotion. I thought I'd try the Blueberry White Tea body butter. It is awesome- get some before it goes away. It is thick and moisturizing, but the scent is light. It isn't super sweet like blueberry- the white tea seems to lighten it. Really good stuff!

I have way too many Scentsy bars just hanging out in my kitchen! I bought a handful at a craft show last month with summer in mind- love this one! It is pear, apple, and lemon.


This is my favorite sunscreen! When we went to Cabo last fall one of the people we were with works in a dermatologist's office and this is what they recommend. It goes on easy, doesn't smell too strong and has protected my very fair daughter well so far this Summer. We spray her with SPF 70 every hour and she has gotten color without getting burnt.

I am a huge fan of oilcloth, especially for a pool bag. It can hold everything and you don't have to worry about wet stuff. Heck, you can rinse it out when you are done. There are tons of oilcloth options on etsy.


These glasses from Pottery Barn look great and they are plastic! I love that you can use a pretty goblet on the back porch without fear!


Lands End makes the best beach towels- they are thick, soft and big! I want to upgrade our beach towels this year- they are faded, thin, rough and too small!


I am fairly certain I would drink more water if it were poured from this gorgeous blue hobnail pitcher. I happened to purchase a knock off version for $15 at Hobby Lobby this week. Hooray!


Essie polishes in fun colors- these are the perfect pedicure colors for summer and I can attest they even look good on pale skin!

Have a great summer!


Monday, June 4, 2012

Root Beer Float Pops


Since my daughter is so interested in cooking right now, I have been trying to find simple recipes that she can help me with. With summer upon us, I though we would have fun making Popsicles and she might even get more fruit in her diet with them.


I have been waiting for Target to come out with inexpensive molds, but got tired of waiting and Crate & Barrel to the rescue. They have a great set of molds and a fun cookbook waiting for me!

We decided to start really simple- two ingredient Root Beer Float pops. 


You simple spoon the vanilla ice cream into the molds leaving space for the root beer. Pour the root beer into the mold and then freeze for about 6 hours. You use about a can of root beer and a pint of ice cream.


Two important things to note: don't let your ice cream melt. It won't leave space for the root beer to mix in. Secondly, you want "flat" root beer so that it doesn't froth up and fill (or spill) from the bubbles. So, open the can and leave it in the fridge overnight.


Up next, coconut pops using Abby's favorite, coconut milk.