Friday, December 14, 2012

How To: Stove Top Cover for Added Buffet Space

One of the stars of my daughter's birthday party this past weekend was my new stove top cover!

Do you see it below? I made a "shelf" to cover my stove top, knobs and all, and therefore make one long serving area in my kitchen. It was a super easy project and made a big impact on my ability to entertain more in my kitchen.


I started my measuring the stove top space that I wanted to cover, the height of my knobs, and the overall depth of my countertop. I took my measurements to Lowe's and found a handy salesman to explain how to make my project work easily. We found a board already cut 2'x3' which was perfect for my space. I paid for a higher quality wood with a 3/4" thickness so that I could place heavy items on my shelf and not need a middle leg which would sit on my glasstop.


Along with my wood, I bought 4 furniture legs and the metal attachments. Then, I simply screwed the metal attachments into the corners of my wood, giving myself a little room to avoid splitting and then screwed the simple wooden leg onto the metal attachment.


They had more beautiful decorative legs, but I wanted the shelf to be low profile so that it blended into my counters better and fully covered my stove below.


Here it is- it fits and completely covers and protects my glass stove top. Now, to have some fun with it!


I pulled out my handy gingham painting mat and my cream Annie Sloan chalk paint and put 3 full coats on the  board and the legs. I then used Frog Tape to tape off an area to do a fun stripe.


I painted a stripe with chalkboard paint thinking how fun it would be to put little messages to my guests or label the food on the shelf; however, I quickly learned that chalkboard paint does not work on top of chalk paint. When I wrote, the word "eat" for my picture, paint flecked off.


So, I painted right over the chalkboard paint with Annie Sloan Emperor's Silk red paint. I then stenciled the word YUM on the stripe.


My husband thought I was crazy, but I wanted something fun on my very practical shelf.


We used the shelf at Abby's party and it happily held her birthday cakes. It allowed me to serve my guests from my kitchen counters which freed up my dining room tables for serving guests or doing crafts. 


Could you use a stove top cover? Make one yourself for under $30!

To see more of Abby's party, click here or here for more Annie Sloan paint projects.

Wednesday, December 12, 2012

Christmas 2012: Abby's "Sweet" Tree

I shared my main Christmas tree here, but wanted to share Abby's sweet tree with you as well and give you a sneak peek of her new purple room! I promise to share details of her new room soon!


I bought her tree when she was just a baby and decided to give it a candy theme. I've had lots of fun buying ornaments of gum drops, lollipops, peppermints, cupcakes, and all sweet imaginable!


She loves her tree and keeps it lit all day long! We have to sneak in her room after she is asleep to turn it off! I am not normally a fan of a white tree, but I love how it provides the right backdrop for all the fun colors on her tree. I can't imagine it green!


I posted this picture on Facebook and it just makes me laugh. She was playing with her little people nativity set and her cars at the same time. It appears the wise men have moved on from camels in 2012 ;)


Merry Christmas to all!

Monday, December 10, 2012

2012 Scrapbook Samples

I had down time and felt inspired a few weekends ago, so I scrapbooked over 20 pages from our past year. I always like to have my year ready to go before December since it is filled with the holidays and my daughter's birthday. Those produce a big chunk of my annual scrapbook and happen at the end of the year! I always have to finish the book in mid-January when Shutterfly runs them 50% off.


Here are a few of my favorites....

My daughter's best "buddy" as she calls him is named Michael. They spend lots of time together as his Momma and I are good friends. Her first sleepover with with Michael. I wanted a page to capture their little friendship at this young age.

Holidays provide some of the best kits for scrapbooking. We attended a local 4th of July parade this past year and it was a super cute small town affair. You'll see Abby's little friend Michael on this page, too!


Finally, I did a page to celebrate Mother's Day and Father's Day. Abby is a definite mix of both of us and I thought it would be fun to capture these so that I can see how they change in future years.  


I love making these books each year and hope Abby treasures them when she is older. I want them to remind us of the life we have, the fun we make, and the love we share.

If you are interested in digital scrapbooking, I highly recommend it! Click here to see and learn more ways I scrapbook digitally.

Saturday, December 8, 2012

Christmas 2012: Festive Vignettes

In keeping with my theme of doing my decorations differently this year (so they seem new and fresh without me buying more!), I decided to set up a couple of vignettes as opposed to placing a few pieces all over the house. I really like the impact my Santa vignette has in the entry way of our home.


Most of these Santa's are not new- I have collected them from local boutiques, gifts from friends, and my favorite holiday stores, Hobby Lobby, Stein Mart, and Home Goods.


This is a new Santa- he is over 3 feet tall and I found him at Home Goods. My husband loves that he folds flat for storing in the garage.


My BELIEVE banner seems fitting for the Santa display. I found it on etsy. Although, with a little twine, burlap and glitter letters you could make one easily.


In my dining room, I set up a more modern and colorful display of presents, balls and Christmas trees. My daughter's 4th birthday party is this weekend and the kids will be doing Christmas crafts in here. I wanted the space to be kid friendly and colorful. I'll be sharing party posts later this month- be sure to check back or follow Your Little Birdie on Facebook for updates!

I wrapped two pieces of  canvas art I already owned with wrapping paper and tulle. You'll also see the canvases of my daughter to the right of the archway... those have been replaced with a fun printable project from Pinterest I shared here


My blue dough bowl from Fredericksburg this summer is filled with blue, green and silver ornaments. I placed three polka dot placemats below it to create a small runner.


On the opposite wall is a really crooked present... sorry about that! Bad camera angle!

I wrapped my American Flag art in aqua paper and hung a bright green wreath on top. It made the perfect backdrop for my funky tree collection. I love these trees and really struggled with placing something so modern in my home when my Christmas is really more classic and cozy. I love this all together now!


 The center tree is made from styrofoam and my daughter and I covered it in peppermint candies and ribbon. I don't think it'll last until next year, but am loving it this year!


This wreath and the matching green trees are from Target last year. The others are from Hobby Lobby in past years.


In my living room, I set up another small vignette on my antique Singer sewing table. It includes our wooden nativity and a little reminder about Christmas that I smile each time I see. The holidays are about so much more than we focus on... LOVE came down at Christmas time.


Finally, at the front of my house, you'll find my copper wise men, a 50% off find on December 26th last year and a few additional wooden decorations. 


To see more of our home this year and in past years, click here! It is all Christmas!

I linked up here, go see more houses!

Thursday, December 6, 2012

Christmas Party Snack Ideas

In planning for Abby's Merry and Bright 4th birthday party, I have come across so many cute displays for food! I am trying to focus on the activities for this party and not the food, so I won't be using all of these ideas, but I love them. Maybe you can use them! 

Brownie bites from the grocery store are delicious, so I can only imagine how great they would taste with a strawberry and a little frosting! These Santa hats are a great pop of color, a little sweet, and super cute.


Cake pops are everywhere and these are simply rice krispies rolled into balls and decorated with the colors of Christmas. I love the addition of the candy cane- it gives you a handle, tastes great and makes them look like ornaments with a hook!


I love a vertical food display- it doubles as a centerpiece and gives you more room in tight spaces. This blogger did a great job using small cookie cutters to make her tree a healthy and pretty display.


How sweet are these snow capped cupcakes? They didn't leave out any detail using an M&M on top and adding a sweet little sign!


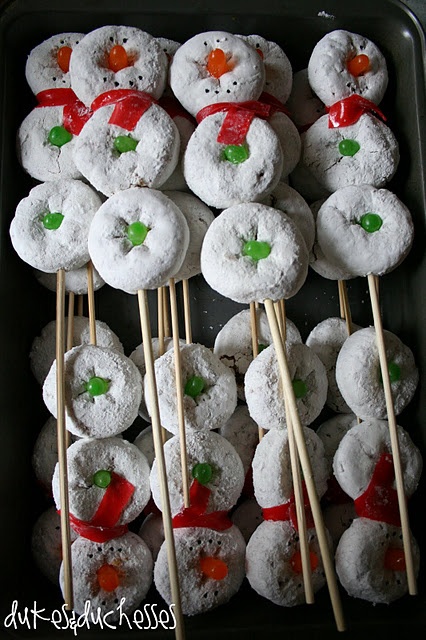
Every kid I know loves powdered doughnuts, so I am sure they would love them on a stick with candy!


I have actually been at a party with a tree made from rice krispies and it was fun! You watched the tree get shorter and shorter as the party went on! Rice krispies are great for cookie cutters because you can use all your scraps and reshape them again and again. 


I hope you have a fun food-filled holiday party coming up and can use some of these cute foods!

* All of these pictures came from Pinterest and when available, the links take you to the original author. Click over and give them some love for the great ideas!

Wednesday, December 5, 2012

Christmas 2012: Bedrooms

I love a warm and cozy Christmas bedroom! I am still tweaking mine to make it what I envision, but love my red and celery green quilts and my new little Christmas family pillow.


Aren't they cute? It was under $5 for the cover at IKEA! I just love them. I have red flannel sheets on the bed, too. It is warm and cozy! If you want to make a Ragamuffin garland like I have on the bed, easy instructions are here.


In my guest bedroom, I added a mitten garland I bought years ago at Land of Nod and a fun Christmas pillow. I need to get the Christmas sheets on this bed for Nana's arrival this weekend!


You could easily make this garland with felt and a little time!


 My little Lori C Mitchell collection is also in my guest bedroom. Aren't these little people cute! I buy these on December 26th every year at an anitque store in nearby Georgetown. I love the character they have! You can find more of her pieces online at Amazon and various stores. 


Merry Merry!

Monday, December 3, 2012

Christmas 2012: Tree and Mantle

I made it a goal this year to make my decorations different than past years. I wanted a fresh perspective without spending money on more decorations. So, welcome to my new 2012 Christmas home!


This year I skipped the garland on my mantles and went for a simpler more rustic look. My small Christmas trees are all 18" tall. I normally place these inside terra cotta pots on my formal dining room table. They serve as a great backdrop for our stockings. 


I just love our stockings! They are from Old Navy and I bought 4 of them when I was just a girl with a boyfriend I hoped would be my husband! They are plaid flannel and are soft and just perfect for my decor style. When we had our daughter (after 8 years of marriage), I finally had them monogrammed.


Our large Santa Clauses have been acquired each year. I always loved them on Christmas displays and would wait for them to be on sale at Hobby Lobby and buy one. The best Santas are bought in October :)

Both of these are technically tree toppers with the clear plastic cone under their clothing. I place them on top of a large candle on the sturdy candle stick holder to give them more height and stabilize them.


If you'd like to see my mantle in past years, here are the links: 2011 2010  2009.

My tree fits the country cozy theme I use in Christmas decorations- I have lots of soft ornaments. I used mittens, sweaters, flannel, big fuzzy Santa beards, vintage Christmas toys, felt and some wooden ornaments. I love our tree- it is a 9 foot skinny tree which works best in our space.


  I am blessed to have two wonderful seamstresses in our family. I alternate tree skirts between a plaid and denim skirt made by my Mom and this one made by my husband's Aunt Iva. I love them both!


Thanks for visiting and Merry Christmas!

I am linking up to a few Christmas parties here, so if this is your first visit, WELCOME! At Your Little Birdie, I share inexpensive craft ideas, lots of recipes, fun things for kids, organizational tips, and party planning ideas. Join along on Facebook or visit me here!

Sunday, December 2, 2012

Pinterest Printables on Canvas for Christmas

I love all of the super cute printables you can find on Pinterest these days and while I normally frame a couple each season, I thought it would be fun to canvas a set of them this year.

I found these chalkboard canvases and decided they would be the ones! I downloaded them from Nest of Posies and then printed them on regular copy paper at Office Max as an 8x10. My other supplies included 4 8x10 canvases from Hobby Lobby, ribbon the width of the canvas trim, Mod Podge, and my glue gun.


I trimmed the pictures to size and then applied a light even coat of Mod Podge on the canvas before smoothing my picture onto the canvas. Don't worry if the edges lift a little.


Next I put another light coat on top of the pictures focusing on the edges. Don't worry if it looks blotchy, it will dry clear....


See! All better now that it is dry!


You could be done at this point, but I wanted to add some ribbon to disguise the canvas a little more. I bought red gingham from Hobby Lobby and just made sure it was the width of my canvas. 


Using hot glue, I ran a strip of glue along the edge of one side and applied my ribbon. I started and stopped on the top right corner with each one. I over lapped the ribbon just a little on each. I used the top as my break thinking everyone who sees these will be shorter than the top. :)


I placed these in my dining room in a spot where I normally have canvases of my daughter. I love the look they create for the holidays!


What do you think?


If you like a little more sparkle in your decor, I think these would be cute with a little silver or gold glitter in key places. I would use glue and highlight word JOY and then sprinkle glitter and dust off the excess. Decorating the curly Qs around tidings would also be fun!

So glad Nest of Posies played around with chalkboard effects and shared with us!

Saturday, December 1, 2012

December Desktop

I love this new digital kit from Sweet Shoppe Designs- it is fun and funky and it makes me smile!


I am using it for my daughter's 4th birthday party that has a Christmas theme to it! Can't wait to share the party with you all in a couple of weeks!

Enjoy your desktop- may your month be merry and bright!