Wednesday, November 30, 2011

Handmade Christmas: Ornament Ball Wreath

As a new stay at home Mom, I am trying to find fun crafts that my 3 year old can help with. I like things to look perfect, but the memory of making something she can be proud of is a better feeling. I am learning :)

The ornament ball wreath is MUCH easier than it looks and really can be done by a small child. I think this would make a great hostess gift, just bring a small 3M hook to hang it for them. You could also surprise a friend by leaving it with a little tag on their front door. Since Abby was part of this one, it'll stay with us and likely be on her bedroom door. I originally found this idea here- her wreath is beautiful!
This is your simple list of supplies- big balls and little balls, ribbon and a clothes hanger. I bought some additional icy looking picks, but didn't end up liking them.
To help Abby, we placed 36 small silver balls in a bucket. I thought we'd need small ones to fill in the little gaps. These were $4.99 per 18 balls and I got them 50% off at Hobby Lobby.
The big colorful balls were 45 for $15 at Wal-Mart. I let Abby pick the colors. I think a silver and gold wreath or a lime green and red would look even better! These balls are the shatterproof kind which is the greatest!
Your wreath form is simply a wire hanger. Reshape the hanger portion into a circle and then undo it at the top where the end is wrapped up. That opens is up to allow you to string the ornaments. I would do a couple big ones and then throw in the silver. Abby got to pick each color and I tried to keep my mouth shut while fearing all the pink would be on one side!
Don't worry if you can see the hanger. You'll see it on the left and then a little twisting of the ornaments allowed me to hide it.
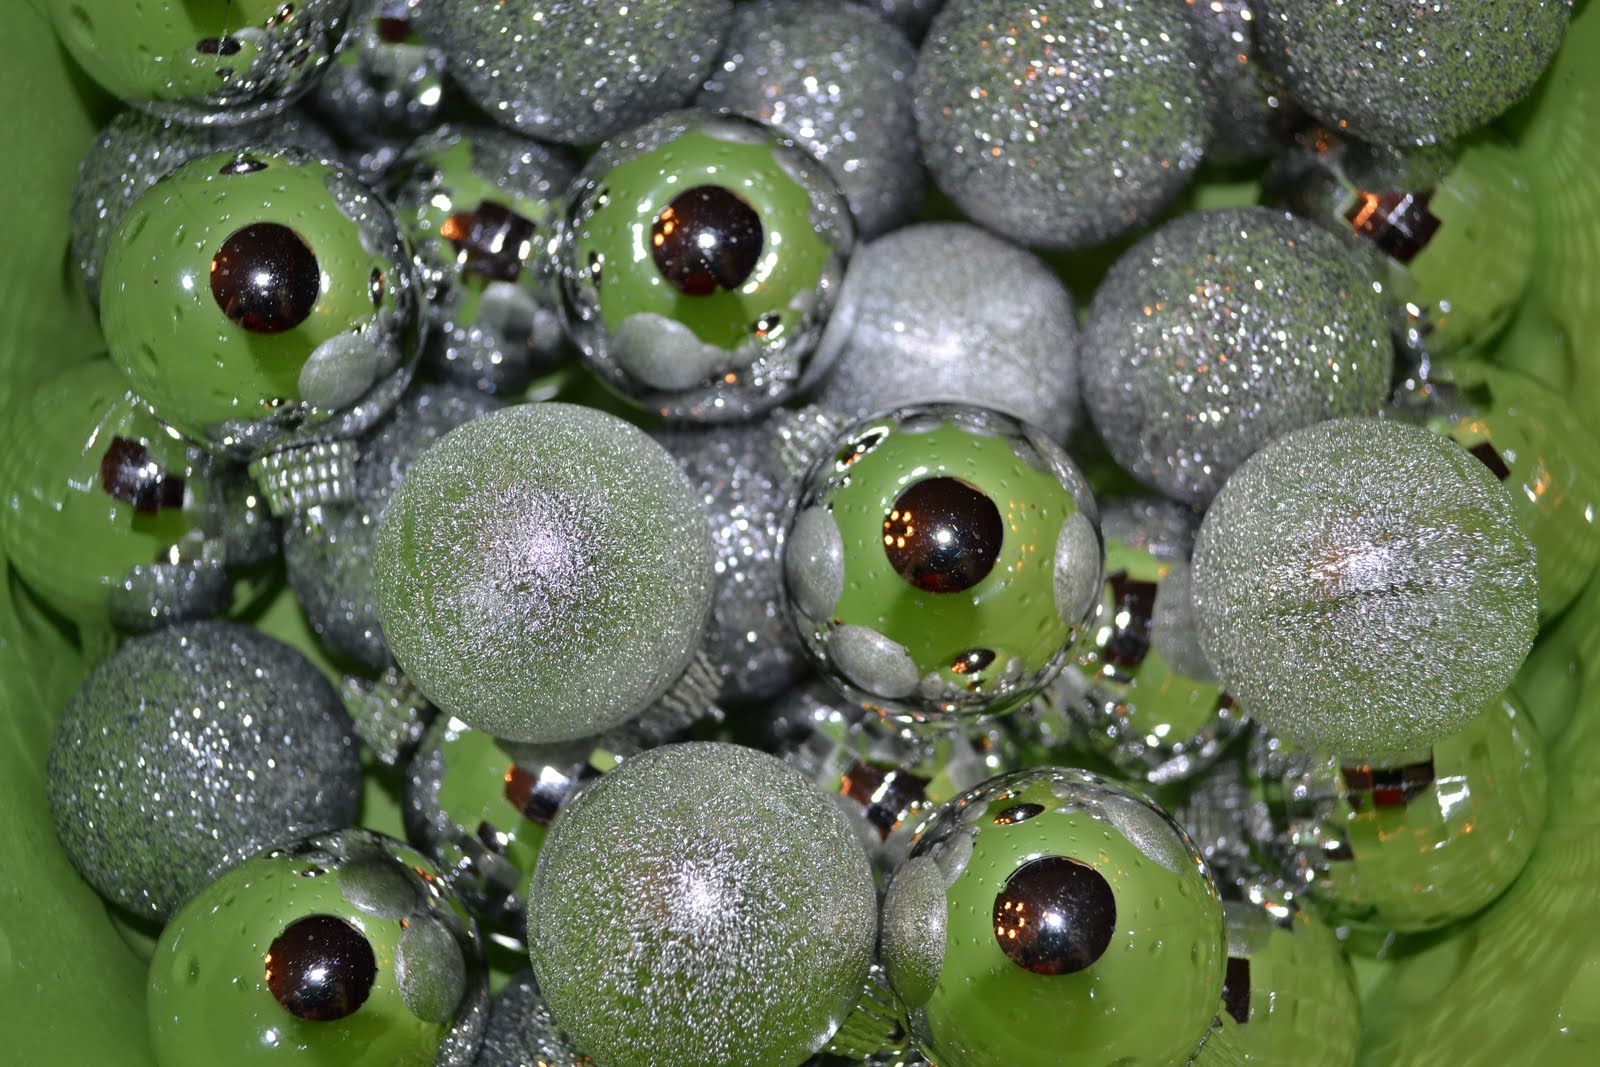
I love the different textures these ornaments provided. Think about that when shopping!

The final step is to close up the hanger by twisting the end back around the hanger. I think wrapped the exposed top in purple ribbon and tied a simple bow on the wreath.
Happy Wreath Making!

Tuesday, November 29, 2011

Handmade Christmas: T Shirt Scarf

Welcome to the second of 12 Days of Handmade Christmas! Over the next 12 days, I'll be featuring handmade gift ideas that are simple to make and most are under $5! Check back each day for more ideas!

I did a post last year about my love of scarves and am excited our Texas winter is coming and we can finally pull out scarves after a long hot summer and fall! Some of my friends from church and I gathered together recently to make t-shirt scarves- these are super simple, really cute, and if you have extra t-shirts on hand like we did, they are FREE!
We watched an online video and learned how to make three different no-sew t-shirt scarves. The yellow scarf below is literally the torso of a t-shirt. You cut across the shirt below the arms and then cut the bottom hem off. The t-shirt fabric will naturally curl on the edges and your scarf is complete!
Another version of that scarf.... take the long tube you made above and cut it into 2 inch strips like the big red pile below.
You then pull them and they'll curl up to make rolled strips, like a necklace. When you wear 8 of them together, you have a cute scarf! We learned that an XL t-shirt makes a really long scarf and a medium would likely be the perfect length. The finished product of the red scarf is below. It was so long that I was able to fold it over a second time!
The final scarf was our favorite- you cut circles out of your shirt using a 9" plate as your template. Once cut out, you begin cutting the circle in a swirl pattern and then stretch your swirl out.
The ruffled scarves in plum and green are from the paper plate method. The thinner your swirls, the longer your strips. The video recommends gluing two strips together; however, ours were plenty long!
These scarves would make such great gifts and could be made at no cost! Just watch the video and follow the steps- super easy! If you want to make a matching no sew t-shirt flower or a posie pin, you'd have an extra special gift!If you need to buy a new shirt, I bought the red one for $3.97 at Wal-Mart. I am now on the lookout for a kelly green t-shirt- I love the green on black on my friend Lachelle!
All three scarves are modeled here- what is your favorite?


Monday, November 28, 2011

Handmade Christmas: Homemade Vanilla

I bake a lot and especially during the holidays. When I saw the idea for homemade vanilla on Pinterest, I wanted to try it. It is super simple and made me feel so domestic for whipping up my own vanilla! Three supplies- super simple!

Vodka- cheap is great. Just grab a bottle at your local liquor store.
Vanilla beans- I ordered mine here, online is MUCH cheaper than your local stores.
Small bottles- also super inexpensive here
You will need about 1.5 beans (the long stalks) per bottle. I made 10 bottles with my 15 beans. Take your bean and slice it in half long ways to expose the actual small black vanilla beans. Then slice the beans across to the length that will fit in your small jar. Fill each of your jars with beans.
Next, fill them with vodka! Put the lid on tight and let them sit for 30 days. You'll see below that the color will darken as time goes on. Mine will be ready in another week and are already significantly darker than here.
Of course I had to use my digital scrapbooking software to create labels! Here are mine as a free download if you'd like.
If you want to make this now and gift it, I would just include a little tag or a note to them with the date it will be ready.

In total, I spent $31 to make 10 jars of vanilla. At $3.16 a bottle, that is about the same as the store, if not a little cheaper. I haven't used mine yet, but I bet using vodka at the liquid base instead of water like the store use, will make for a stronger vanilla!

See you tomorrow as we continue with 12 days of handmade Christmas!

Sunday, November 27, 2011

December Desktop

I am sharing these a little early because 12 Days of Handmade Christmas starts tomorrow! I'm excited to share 12 different gift ideas that you can make to give this holiday season. They are simple, with few supplies and most cost less than $5. I hope you'll check back over the next 12 days and enjoy!

For December, I made two calendars for you to enjoy! As a Christian, I am always working hard to make this month about the birth of my Savior and not the gifts of Saint Nick, but it is so hard! This first calendar represents the simplicity I wish my holidays had- the singular focus on baby Jesus.
The second is the reality of the holidays for most of us- the busyness of the holidays, but also the sparkle they bring to our families, our home, and our friendships. Both are beautiful parts of life!
Have a very Merry Christmas!

Thursday, November 24, 2011

Happy Thanksgiving with a family favorite recipe

I hope everyone is having a wonderful Thanksgiving. I love this holiday- the food, football, and low stress of it. We have a small family and do Thanksgiving very casually. I would love to dress up and have a fancy meal one Thanksgiving, but overall, I like this version!

Our Thanksgiving would not be complete without my Aunt Vicki's Cranberry Salad. Because cranberries are so festive, you can make this for any holiday party- it is great for potlucks at Christmastime. It is simple, gets better the longer is sets, and beats the jellied cranberry from a can everyday!
Chop up a bag of fresh cranberries. My little Cuisinart chopper is great for this!
I even buy a couple and freeze them for later.

Pour in a large can of crushed pineapple, a bag of mini marshmallows, 1/2 cup sugar and a handful of chopped pecans. Stir it up.
Here comes the good part- pour whipping cream over the mixture and stir. I typically buy the large one and pour, stir, and pour some more. You don't want to runny, but want everything real covered. Overnight, the whipping cream and marshmallows become one and the dish is solid.
Chill it overnight and enjoy from our family to yours!

Happy Thanksgiving!

Tuesday, November 22, 2011

Wooden Ruler Growth Chart

I saw this growth chart through a Pinterest post and knew I had finally found the growth chart I wanted for my home. My daughter is almost three and I have looked at growth charts for years. Nothing made me happy- too themey, too big, too child-like!
Based upon her post, I went out and bought a 1x8x6 board at Lowe's. I went with a little higher priced Aspen pine to avoid having knots in my finished product. I also bought a small container of stain in the color Autumn. After sanding the board and beating it with a hammer and screwdriver to age it, I applied 2 thin coats of stain to the board using a sponge brush from Hobby Lobby.

I then rubbed on a medium colored brown paint and rubbed it off with a wet rag. I wanted a little more depth and color to my aged ruler.

Once my color was achieved, I went over the edges again with the sander just to help age it more. I want a ruler than looks like an old plank from a schoolhouse!
Now it was time to make my board a ruler! Knowing that it will be hanging on the wall and off the ground, I started it at 6" rather than at zero. So, 6 inches up, I made my first mark and considered that 1 foot. I then marked every 12 inches in pencil. I went back with my black Sharpie and made those 1 foot marks 2" long. After my 6 feet were marked, I went back to every 6" and made 1.5" marks and then at the 3" point, I made 1" marks.
Now, it was time to add the numbers and this part stressed me out the most. But, 517 Creations had the most genius way to do it! She used 200 point Century font for her numbers, so I did the same. Once they were printed, I laid the number on the ruler where it belonged and pressing firmly into the paper with my pencil, outlined the number. Look what happened! Genius! I was able to go back in and fill in all my numbers with the Sharpie in no time!
My goal in selecting the stain and brown paint was to match my hardwood floor. Look at how close I got- the extra floor plank is lying on top the ruler. Winning!

To hang my finished product, I placed a zig zag hanger on the back of the ruler at the 6' mark. That made is easy to place my nail 6 feet off the ground on the wall. My first test was my 37" child :)
Here is a closeup of my finished product on the wall. It looks wonderful!

This was such a fun project- I love the finished results and it didn't take nearly as much time as I expected. Plus, we have a fun focal point in the living room. It makes me laugh as I think about the height strips at local gas stations- we have our own in case a criminal runs out the back door!


Wednesday, November 16, 2011

My Charming Husband

My husband Marcus and I met when I was a freshman in college and he was in his 3rd year. We were friends for about 5 months through a college organization and then began dating in February of the following year. When our first Christmas arrived, he came to my parents house over the long Christmas break and presented me with a charm bracelet and the Noel charm seen below, for our first Noel together.
We've spent every Christmas together since then and I always have a new Christmas charm in the toe of my stocking- it is the last thing I open each year.
This year will be our 17th Christmas together and this bracelet becomes more valuable to me each year. The wisemen above represent our first Christmas as Christians in 2003. The Mary and baby Jesus below, from 2008 when our daughter was born. The car, 2004, when we bought my Passat for Christmas.
I love that they mean something, that we have a tradition from our very first year together, that my bracelet will only grow as our marriage does. And, that I have something of meaning to hand to Abby Lu when I meet Jesus.
If you are newly married, attending a wedding this holiday season, or looking to start a new tradition, I couldn't recommend a Christmas bracelet more! Most of mine are from a local jeweler James Avery, but you can look anywhere and find Christmas charms!

Pardon the pictures... it is tough to capture a charm bracelet clear and up close! I don't know how she did it!

Wednesday, November 9, 2011

Bracelet Love

I am currently coveting three bracelets out of my budget! Maybe Santa or the bonus fairy will bring them to me!

Aren't there Tory Burch leather cuffs cute? I tried on the black one at the mall and it is super cute on- good thing they didn't have orange in the store or I might have made the purchase!
I fell in love with this bracelet on the plane to Cabo in September and when we landed I got up the nerve to ask the other passenger who made it. The detail on it is amazing- it is very Brighton-esque, but more "mature" without the hearts and flowers. She told me Konstantino whom I had never heard of. I asked her where to find his designs and got the most snotty look as she told me Neiman Marcus. No wonder I hadn't heard of him! I thought about this bracelet all week in Mexico and when we got internet on the plane ride home I finally looked it up. Yea, not in the budget.
Then, this week my Sundance catalog came in the mail and the Avalon bracelet was pictured. Isn't this a close version of my beloved Konstantino? It is much more affordable and I really love the details!
Sometimes it is easy to make the right decision and walk away from something you want, but don't need and sometimes the decision is tough!

Sunday, November 6, 2011

Oh Pinterest, You've Stolen my Free Time

I spend more time on Pinterest than Etsy now and I think that is a good thing! I am finding new recipes, crafts and dreaming about future projects. Here are a few of my favorites:

I love this whole outfit, but most especially the purse! Isn't it pretty! This outfit was created with Polyvore- you should check that time killer out, too! Don't fall in love with the jacket- it is leather and isn't cheap :)
I learned on Pinterest that you can shred cooked chicken breasts in your Kitchen Aid. That is helpful!
Isn't this nursery cute! I am beyond needing these letters with a toddler and no babies coming, but someone must use this! Everyone at this Mom's showers were asked to bring a letter and that is how she built a cool collection! Genius!
We are bed browsing for Abby's toddler room and I love the idea of this. It won't work for her current room, but I think would be super cute for a pre-teen boy!
Pinterest is also filled with lots of inspiring quotes. I have a whole board dedicated to quotes and love this new one. Although my jean size has gone down recently, I am trying to feel beautiful no matter where it is.
On the other end of that spectrum, oh my Lord, this cake must be on my holiday plans- Chocolate Peppermint Marshmallow Cake. Yummy!
Click here to follow me on Pinterest and see all kinds of great pins!

Thursday, November 3, 2011

Handmade Christmas Gifts

UPDATE: Click here for the 12 Days of Handmade Christmas posts. Enjoy!

Long time birdie readers will remember that last Christmas I did a 12 days series featuring my favorites... place to buy shoes, person, blog post, etc. It was fun and I've been thinking about what to do this year. With my new limited budget and my new love of Pinterest, I am planning to do 12 straight days of simple, inexpensive handmade Christmas gifts.
These aren't the types of gifts you buy your Mom or husband, but are perfect for teachers, neighbors, co-workers, etc. I plan to make handmade gifts for many people this year and I want to share my gifts with all of you.

But, I also know there are many more crafty chicks out there with great handmade gifts! I'd love to feature you, too! Email me at annajenk AT yahoo.com and send me a link to your post (old or new) featuring simple handmade gifts. I'll add your link and gift ideas to my links each day. Email me by November 25th to participate!

The party will start on Monday, November 28th. To give you a little sneak peek, I'm already envisioning homemade sugar scrubs, snow globes, ornaments, and sweets!

I hope you'll join me!